DV360 - Customer Match Destination
Intro
| Important note |
| This functionality isn't available as standard to all users. Please contact your InfoSum representative to learn more about how to gain access. |
| Destination only available for owned Datasets |
| When using Customer Match, you may only upload customer information that you collected in the first-party context, such as information that you collected from your websites, apps, physical shops or other situations where customers shared their information directly with you. Read more on Google's data policy here |
Saved destinations are available to all users in your company and can be reused indefinitely.
Table of contents
Creating a DV360 - Customer Match destination
Customer Match pre-requisite
Before configuring anything within the InfoSum platform, you must link InfoSum as a Customer Match Upload advertiser using the Advertiser ID within your DV360 account. Please follow the steps outlined by Google here.
| Important Google Update |
| Please note that as of 6th March 2024, Google has introduced new EU consent policies to their Audience Partner API. Click here for more information. New consent fields must be completed in order to push your data to Google customer match destinations. Users outside of the European Economic Area (EEA) will still need to complete these fields in order to send their data to Google but restrictions may differ. |
Activation keys
- Mobile Advertiser ID (MAID) alongside App ID
- Phone number & Country code
- First name
- Last name
- City
- US State
- Zip / Postcode
Note:
- You must specify one of the following within your DV360 - Customer Match activation (all other columns are optional.):
- Email, or
- MAID, or
- Phone number and Country Code (include + symbol)
- You must ensure that each field is formatted correctly as per Google's requirements here.
- When sending MAID's, it is important to note that IDFA and AAID must be split into separate columns upon data upload to the InfoSum platform as Google require them separately.
- You cannot combine MAID's with any other ID
Creating a DV360 - Customer Match destination
First, select the Destinations tab under Activate and then click Create a New Destination.
The form below appears when you select DV360 - Customer Match as your destination type and the following fields need to be completed:
- Destination Type: Select DV360 - Customer Match.
- Name: Identifies the destination
- Description: A free-text explanation of the destination
Once completed, press Next.
Adding DV360 - Customer Match connection details
Use destinations to create a connection between the InfoSum Platform and your DV360 Advertiser account.
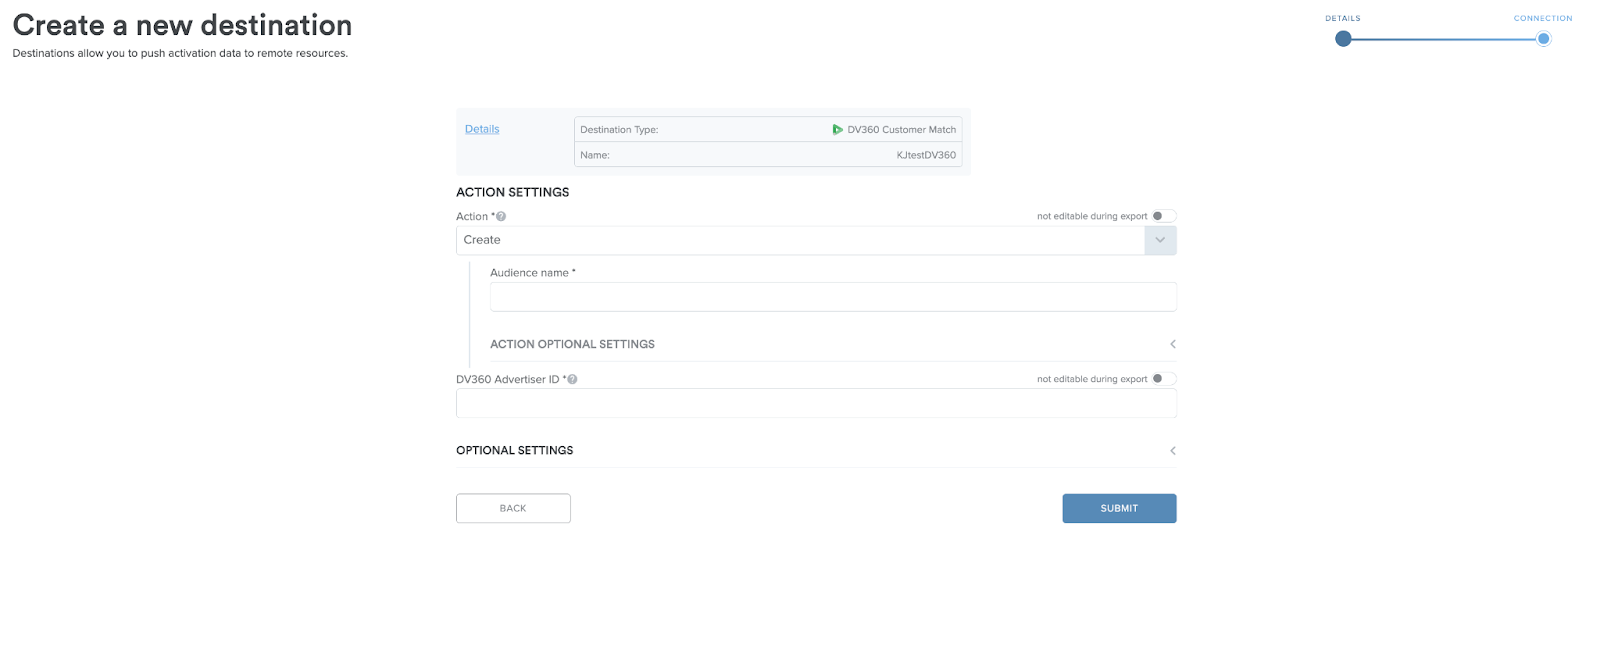
The above form contains the following fields:
-
Action
- Create, Create new audience
- Append, add new records to an existing audience in DV360
- Replace, overwrite an existing audience that you have previously uploaded to DV360.
- Remove, remove records from existing DV360 audience
-
Audience name
- Audience description (Optional)
- Mobile application unique identifier (Optional)
- DV360 Advertiser ID, your DV360 platform ID to push
-
Optional setting of TTL for audience: Leaving this field blank will default to a TTL of 20 days. This field must be between 0 and 540 inclusive.
You can toggle the action field, the DV360 advertiser ID field and the TTL field to be editable at push time if you wish and then click Submit to save the destination.
Note: Google requires the add and remove functions to be separate actions and not submitted together in a single push to DV360. You will need to create separate destinations for adding and removing records to an audience.
The saved destination is stored in the Platform’s Destinations page and can be selected in the Activations tab when pushing an activation file to a remote resource. The destination can be reused and is available to all users in your company.
For details of how to export your audience to a DV360 - Customer Match destination, see Exporting results to a destination and DV360 export configuration fields.
Exporting results to a DV360 - Customer Match destination
You can activate results to a Destination using either Segment Builder or the Query Tool.
- Navigate to Activation Segments & start an export
Once you’ve created the activation segment, go to the Activation Segments tab under Activate, where you can find all of the historic segments that have been created by your team for that collaboration. Please ensure you are in the correct Collaboration view at the top for the Activation you're looking for.
A ‘ready’ status shows that the query has been successful and is ready to be sent to a Destination. Activation segments are only ‘Ready’ for 36 hours, this is to ensure that you are always exporting the freshest data. You can easily refresh a segment by clicking ‘refresh’ in the details panel of each segment.
When you select an Activation segment, an information panel appears on the side of the page allowing you to view the segment and export it to a Destination with the correct permissions for that Collaboration.
You can click ‘Export’ to start a new export, or click ‘View’ / double-click on the activation segment name to view all exports associated with this segment.
2. Select your destination
After you click Export, a new pane will appear with a list of the destinations available for this segment. You will be able to see all the Destinations that your company owns or has permission to use for that Collaboration. Select your destination, and configure any custom fields.
3. Configure the export
When you select the correct Destination, the pop up will show additional options, including column mapping if required and optional fields.
DV360 - Customer Match export configuration fields
| Field Name | Description |
| Destination | Select a saved DV360 - Customer Match destination |
| Action |
Choose one of the following:
|
| Audience Name & Audience Expiry | If creating a new audience, enter the name of the audience that you are creating with this export and choose an expiry for your audience. |
| Audience ID | If adding/replacing/removing from an existing audience, copy and paste the audience ID (found within your DV360 account) into the audience ID field. |
| Customer List type & My Dataset Mapping column | Select the data you have chosen to export, either Mobile IDs or Contact information. Then map the column heading in your dataset that you want to map to a DV360 - Customer Match dataset column heading. Click Add Another for each column to be added. |
| DV360 Mapping Dataset |
Select a DV360 - Customer Match dataset column to map your column to. InfoSum supports the following DV360 - Customer Match columns:
Note:
|
| Consent status for the user sending the data to Google | Confirm if the person sending the data to Google has the appropriate consent to be able to send the data to be used for advertising purposes. Choose from granted/denied/unspecified. |
| Consent status for the data to be used in ad personalization | Confirm that all users in the data to be exported have consented to their information being used for personalized advertising. Choose from granted/denied/unspecified. |
Note: If you are unsure if the data you are sending is consented, please check with the data owner first. Customers sending data being used in the European Economic Area (EEA) will not be able to send data unless consent has been granted for both fields.
4. Click Export to Destination to initiate the activation.
Additional Information
- Google require a minimum of 1000 users per DV360 - Customer Match audience.
- Google have a maximum DV360 - Customer Match audience size of 5M records.
- If opting to send a multi value key column, please ensure that you select to flatten the output when saving the activation segment (this must be done via IQL query tool).
- You can find your InfoSum uploaded audiences within the Audiences module of your chosen Advertiser account.